By enjoy life, http:// hubpages.com
Is it hard to play guitar?
Learning to play guitar is easier than you think. Really the hardest part is the initial step to pick up a guitar and be motivated to learn the basics.I have played guitar for many years, and have had people ask me to show them how to play. I have sat down with many people, guitar in hand and gone through the basics with them, teaching them a few guitar chords, like D, G, C, as well as showing them some basics on how to position their fingers
I think many of these people think that somehow their fingers will automatically know what to do, without any effort! After running through these basics with them, I encourage them to go away and practice, taking the time to learn the chords and get their fingers used to playing them. I say to them, once you have gotten used to those basics, come back to em and I will teach you more.
It seems like a few weeks goes past, then I ask them, 'I thought you were going to come back to me for more guitar lessons... have you practiced what I showed you?'
The answer seems to always be the same, 'no it's too hard, my fingers don't want to move into position properly'
Many of these people want to 'be making incredible music' from the start, not realising that you have to get these basics in place. Once you can learn the basic chords - A, B, C, D, E, F, G - moving forward from there is much easier, and you can start sounding like a real musician!
It's getting yourself past the first step that seems to be the biggest challenge for many who desire to play guitar.
I encourage you, as I go through this series of articles on learning the basics of guitar, to keep at it. Don't stop just because you don't sound amazing in 10 minutes. Take the time to properly work at the basics, learning the basic chords for the guitar. Practice them regularly and get your fingers used to the movements and positioning.
Once you learn some basic chords, we can look at strumming. However if you cannot even learn a few basic guitar chords, there is no point learning even your first song!
The starting point to you becoming an amazing world class musician is to be willing to take the time to learn your first few initial guitar chords. Practice, work at it and get your fingers used to the neck of the guitar and properly holding down the chords so that you can clearly her each string when you pluck it
I hope that this article starts you off with some motivation to learn guitar, next we will discuss some of the chords you need to learn and how to position your fingers on the guitar neck correctly for those chords
Basic Guitar Chords
What do you need to know to play guitar?
In the previous article, we discussed some important principles that you, the new guitarist, needs to keep in mind as you step out to learn the guitar. In this article we will build upon those principles and begin to explore your first steps in playing the guitar and what you need to make sure you learn.When learning to play acoustic guitar, there are some basic things you need to learn upon which the rest of your guitar playing skills will be built. These include some basic knowledge of scales and chords.
In this article, we will focus on some of the basic chords you need to learn.
There are a huge amount of chords that are possible, but most of them are more complex, and many guitar players may never even use these complex chords. To be honest, a lot can be done by just learning the basic foundational chords and how to play them on the guitar. How many chords you learn is really up to you, as you can sit down with chord charts and learn chord after chord!
I recommend first learning the basic guitar chords listed in this article and the next article. Once you have mastered these and gotten your fingers used to the positions (as well as ensuring the strings all sound clear when plucked as you hold the chords down), you can think about moving on to more complex chords. You may want to gradually add to your chord repitoire, learning 1 new one a week after the basics.
Many people don't realise it but a huge amount of popular and well known songs can be played by you as a guitarist only knowing a handful of chords!
Guitar neck
How to read guitar chords:
Before we get to some actual guitar chords, let's explain how to read the diagrams commonly used for guitar chords.To the side you can see a picture of a guitar neck. The circled area points to a rectangular diagram on the side, which is how guitar chords are written. This diagram is usually written to represent the neck of the guitar as shown.
This will help you figure out how each chord goes on the guitar neck in the next section.
The main guitar chords to master:
In music theory, chords are named using letters of the alphabet, and range from A to G. (in between there are what are called sharps and flats, but we will not deal with those right now)Of each chord formaation there are a variety of variations, but for your basic foundation we would recommend learning the majors, minors and sevenths of each.
In other words A major, A minor and A seventh. these would be written A, Am and A7 respectively.
So over this article and the next one we are going to learn these variations from A to G
The diagram below lists the first group of these to learn - the majors, or in other words A, B, C, D, E, F and G
You may find that B and F are the harder ones to learn, so try to master the other ones first. This will help your fingers get used to moving on the guitar neck before you attempt the harder B and F chords.
Guitar Chord Chart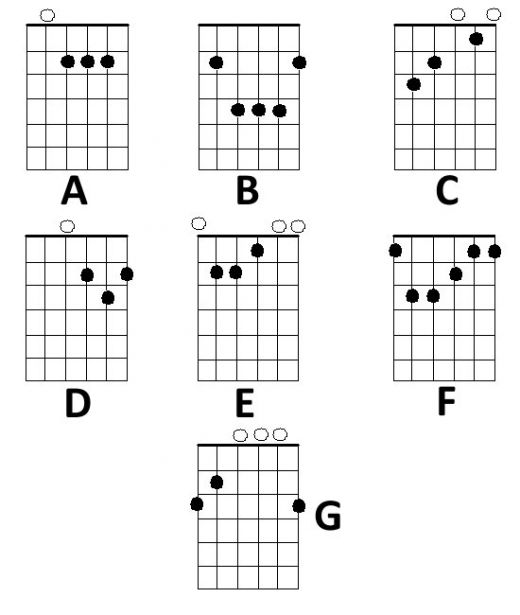
Basic Guitar Chords to Learn.For all you Lefties OUT THERE!!! Left Handed Guitar Fretboard and Chord Chart Instructional Poster
How to play the guitar chords
Firstly, pick a chord you are going to learn, for example A.Next, look at the diagram and position your fingers according to the diagram, making sure you count specifically which string you place your finger on, as shown in the picture.
The horizontal lines on the picture show the lines on the neck of the guitar, whcih are called frets. It is important that you place your fingers in between the correct fret, or else it will not sound right. the vertical lines on the picture represent the 6 guitar strings.
Once you have figured out the positioning, attempt to play each string of the guitar with your other hand. It does not matter right now if you sound like a great musician as you pluck each string. What counts for now is that you learn how to correctly position your fingers so that each string produces a clear sound when you pull it. If the string gives a muffled sound, then your finger positioning needs work. It may be that one of your other fingers is resting against that string unknown to you, so examine each finger carefully on teh neck of the guitar to see which one is causing the problem.
Once you master the chord, take your fingers off and try to put them back on again for the same chord. again check the strings sound clear.
At first it may seem like your fingers do not want to move into the correct positions, but persistence and practive will soon teach your fingers how to move and eventually it will become easy and second nature for them to go into positon when you play the chord.
Go through all the chords on the chart and learn them, attempting them on your guitar.
Right Hand Guitar Fretboard and Chord Chart Instructional PosterOnce you master these, we will look at the minors and sevenths, in the next lesson
I hope this has helped you move forward in learning to play the acoustic guitar. As you work at it you will soon be a skilful musician!
Basic Guitar Chords Part 2
What we have seen so far
This is the third article in a series on how to play guitar. In the first article, we went through some important things you need to keep in mind as you start out on your new venture of learning guitar.The second article began to look at chords, starting with the major chords you need to learn
In this article we will build on that foundation and look at the minor chords and sevenths.
Once you have grasped the majors, minors and sevenths, you will be in a great position to learn quite a range of new songs. Then we will need to learn about things like strumming, and scales - but that is for later articles.
For now, your focus is on picking up these basic chords and learning to get your fingers into position. As your practice these chord shapes, learning to get your fingers correctly positioned on the guitar neck so that each string sounds clear when you pluck it, you will find that your fingers get more familiar with the guitar neck and more comfortable moving around it
How to Read Guitar Chords
The
diagram to the right reminds us of how to read the chord charts we
will look at in this article. Each chord chart is written to represent
the neck of the guitar as if it was being held as shown in the diagram.
Minor Chords
The minor chords
The chart to the right shows the positioning of the minor chords from A to G.As you start learning to play these, you will soon notice that there are a number of similarities between some of them. For example Am, Bm and Cm all follow a similar pattern except they are moved up the neck of the guitar slightly.
You may also notice that in the Bm and Cm chords, there are 5 black dots, representing 5 fingers... but hold on a second, you only have 4 fingers available to play each chord (since your thumb is wrapped around the back of the guitar neck!). This is because 2 of the black dots are played using the same finger:
Bm and Cm are what we call BAR CHORDS and they require your index finger to be pressed against all of the strings of the guitar in the same fret
On the BM chord, this index finger is placed on the second fret of the guitar neck (and then the rest of the fingers are placed in a shape similar to the Am chord). On the Cm chord, this exact shape is simply moved up one fret on the guitar neck.
The bar chords are much harder to play, so you may want to leave lerning thos until you have mastered the others. They will take more work and practice, so do not get discouraged if you do not get ahold of them instantly
You will notice a similar pattern to the Em, Fm and Gm chords. They all follow the same basic pattern as the Em, except the Fm is moved up on fret, with the index finger layed across all the strings of on the first fret. The Gm is then played by moving that same pattern up 2 frets.
This may all sound complicated and take a bit of thinking and practice, but you will get it!
Guitar Chords: sevenths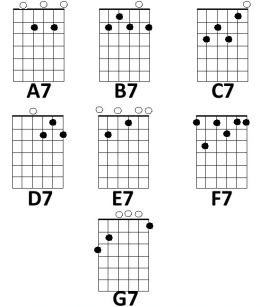
The sevenths
Out of themajor, minor and seventh chords, on the guitar, the minors are probably the hardest to play, as they involve a lot of bar chords. The sevenths are easier, as there is only one bar chord in the group - the F7Also, once you have had a look at the majors, minors and sevenths, you will notice that various letters of chords are grouped in similar areas of your guitar neck. For example A, Am and A7 are very similar, except with one of 2 finger changes. It is hte same with most of the rest of them.
Start learning the various chords we have gone through so far. We will be adding artilces on strumming and scales soon. But for now get a hold of at least some of the chords. Learning all of the chords we have looked at so far will take time. You may want to start by getting ahold of groups of them. Once you have a few of them sorted, you can also move onto scales and strumming while continueing to learn more chords
Understanding your guitar
In the next article, we will help you understand the layout of your guitar, as well as the names of the strings etcBefore you start reading, CHECK THIS OUT, Fender SA-100 Upgrade Acoustic Guitar Package - in Natural
Understanding your guitar
A basic grasp of music theory
As part of learning to play the guitar, you will need a basic grasp of music theory. This will help you understand the layout of the guitar stringsMusical notes and chords are both labelled using letter of the alphabet, ranging from A to G. Included inbetween some of these there are what are called 'Sharps' or 'Flats'. Actually a sharp and a flat is basically the same note or chord, depending upon where you are coming from - as you will see as we progress.
Sharps are written using # Flats are written using b
So a full list of the possible chords (or notes - as they follow the same pattern) are as follows:
A A# B C C# D D# E F F# G G#
Once you reach G#, the sequence goes back to the start and repeats over and over. You will notice that there are not sharps (or flats) in between B & C or inbetween E & F
As I said, sharps and flats are basically the same notes or chords, so an A# is also a Bb
We can then rewrite the above list of chords, but substitute the names of the flats instead of the sharps:
A Bb B C Db D Eb E F Gb G Ab
It is important that you familiarise yourself with these lists, as you will see later in this article that the names of the guitar strings and the specific notes on the guitar use this pattern
Parts of the Guitar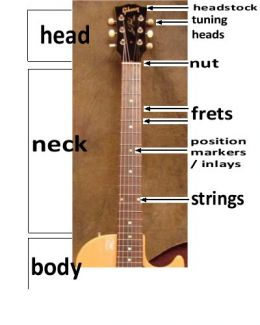
The neck of the guitar
Now that you understand those basics of music theory, you can begin to place that information into how the guitar strings are laid out.The diagram to the side illustrates the parts of the guitar(some parts of the guitar go by differnent names, so you may see similar diagrams using different names for the guitar parts, other parts are more standad names)
Frets
These are the solid lines that run along the neck of the guitar. When placing your fingers on the neck of the guitart to play scales, notes or chords; they must be placed in between the frets. You do not place your fingers on top of the fretsEach guitar string has a letter name, which corresponds to the letters above for music theory. We will tell you in the next section what the letter name each guitar string has.
Moving your finger up one fret, moves the note up one as well.
For example one of the guitar strings is called 'A'. If you place your finger on the first fret of the A string, you are now playing A# or Bb. If you move it up another fret, you are now playing B, then up another one takes you to C, then C#, D etc
names of the guitar strings
Names of the Strings
As mentioned above, each string of the guitar is named according to one of the letters of music theory notes, covered in the above section.The thickest string (which is positioned on the top of your guitar, closest to your head when you hold it correctly) is called E. Because this string is a bass sounding string, it is not called the top string, but the bottom string! This may be confusing at first, since when you hold the guitar it is the top string positionally, but musically it is the bottom string.
The next thickest string, next to the E, is A
Then D, G, B
The final string, the thinnest one on the guitar is also called E. Positionally as you hold the guitar, this is the lowest string, furthest from yoru head, but it is called the top string, because in music theory it is the highest sounding pitch
So the sequence of strings is: E A D G B E
The diagram to the side shows this, make sure you understand which string is labelled which letter, according to the diagram. Make sure you memorise this sequence, as a lot of your ability to play the guitar will build from this sequence.
the guitar string notes
The sequence of notes on guitar neck
now that you have a basic grasp of music theory, and know the names of the guitar strings, you can fit these 2 bits of information together and see how the notes on the guitar are worked out.The diagram to the side uses the E string (the thickest string).
If you pluck the string without putting any fingers on the guitar neck, you are playing the E note. This is called playing and 'open string'
If you now place one of the fingers of your left hand on that same string, in the space before the first fret, and pluck the string; you are now playing an F note
Move your finger up a fret, and play it, you ar enow playing the F#. Continue moving your finger up one fret at a time and pluck it. Each time you are moving one note up.
Do you notice how the sound of the notes you are playing progressively moves higher?
You can do this for each string of the guitar, but remember each string has a different starting note. So if you place the next thickest string, the A, the open note is A.
Placing your finger on before the first fret, you are now playing A#, move it up a fret and you are now playing B, then C.
try to move your finger up a fret and each time figure out what note you are playing. Do this for each string, and try doing it for a few days to get familiar with the sequence. this may seem very laboriouse and unexciting, but it will really help your guitar playing later on.
Eventually this will become 'second nature' and you will find yourself looking at the neck of the guitar and very easily being able to tell what note a particualr fret of any particualr string is
"LOOK" The Guitar Wheel - The ONLY Music Theory tool referred by other Guitarists!
No comments:
Post a Comment